October 27, 2014

Mandelbrot!!

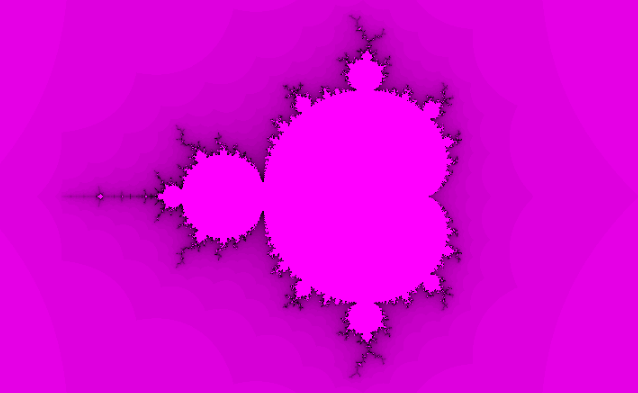
Omg looky:

Link to shadertoy
The version on shadertoy gradually changes colors.

Here's my source code:
struct complex {
float r;
    float i;
};

complex add(complex c1, complex c2) {
return complex(c1.r + c2.r, c1.i + c2.i);
}

complex multiply(complex c1, complex c2) {
complex c_new = complex(0.0, 0.0);
    c_new.r = c1.r * c2.r - (c1.i * c2.i);
    c_new.i = c1.r * c2.i + (c1.i * c2.r);
    return c_new;
}

vec2 create_uv() {
    float aspectRatio = iResolution.x / iResolution.y;
float scaling = 2.5;
    vec2 uv = (gl_FragCoord.xy / iResolution.xy) * scaling;
    uv.x = uv.x * aspectRatio - scaling * 1.1;
    uv.y -= scaling / 2.0;
    return uv;
}

bool has_escaped(complex c) {
return abs(c.r) + abs(c.i) >= 4.0;
}

void main(void)
{
    vec2 uv = create_uv();
 
    complex z = complex(uv.x, uv.y);
    complex c = complex(uv.x, uv.y);
 
vec3 col = vec3(0.0);
    const float iterations = 50.0;
    for (float i = 0.0; i < iterations; i++) {
  complex z_new = multiply(z, z);
        z = add(z_new, c);
        if (has_escaped(z)) {
            col += vec3(i / iterations, 0.0, i / iterations);
            col.z = col.z + 0.05*cos(iGlobalTime);
            break;
        }
    }
 
    gl_FragColor = vec4(col, 1.0);
}

What's happening is basically that we're in the complex number plane and all that means is we count its value on the x axis as a real number but we count its value on the y axis as an imaginary number.  We apply an equation for each pixel (remember we represent the pixel with a real number on x axis, imaginary number on y axis) and see if the results are greater than a certain number after running through the equation several times.  If they are greater (they "escape"), we color the point based on how quickly it escaped (how many times we ran it through the equation until it reached that number).  The Mandelbrot set is the set of all points who haven't escaped (the black part in the middle).

Ray traced Sphere with Reflection

So I kinda hacked the reflection but it looks right:

How do I gif rid of the annoying "created with..."
link on shadertoy

CODE:
struct sphere {
    vec3 pos;
    float radius;
    vec3 col;
    int id;
};
 
vec3 light = vec3(9.0, 3.0, 8.0);
vec3 eye = vec3(0.0, 0.0, 8.0);
vec3 up = vec3(0.0, 1.0, 0.0);
sphere s1;
sphere s2;

struct eye_coord_system  {
    vec3 n;
    vec3 u;
    vec3 v;
};

float iSphere(vec3 ray_origin, vec3 ray_direction, sphere sph) {
    vec3 d = ray_direction;
    float a = dot(d, d);
    float b = 2.0 * dot(d, ray_origin - sph.pos);
    float c = dot(ray_origin - sph.pos, ray_origin - sph.pos) - (sph.radius * sph.radius);
    float delta = b*b - 4.0*a*c;
    float t = delta < 0.0 ? -1.0 : (-b - sqrt(delta)) / (2.0*a);
    return t;
}

vec3 get_sphere_normal(vec3 pos, sphere sph ) {
    return (pos - sph.pos)/sph.radius;
}

vec3 get_color_of_point(eye_coord_system eye_coord, vec3 ray_origin, vec3 ray_direction, sphere sph, vec3 col) {
    float intersection = iSphere(ray_origin, ray_direction, sph);
    if(intersection > 0.0) {
        vec3 pos = ray_origin + intersection*ray_direction;
        vec3 nor = get_sphere_normal(pos, sph);
        vec3 reflection = normalize(reflect(ray_direction, nor));
        float diffuse = max(0.0, dot(nor, normalize(light)));
        float specular = pow(dot(reflection, eye_coord.u), 30.0);
        specular = max(specular, 0.000001); // for some reason 0.0 returns crappy results

        if (sph.id == 1) {
            float reflect_intersection = iSphere(pos, reflection, s2);
            vec3 reflection = vec3(0.0);
            if (reflect_intersection > 0.0) {
                reflection = vec3(s2.col * diffuse);
            }
         
            col = vec3(diffuse + reflection + specular);
        }
     
        else if (sph.id == 2) {
            col = s2.col * diffuse + specular*0.5;
        }
     
    }
 
    return col;
}

vec2 dance_little_sphere() {
    return vec2 (cos(iGlobalTime), sin(iGlobalTime));
}

eye_coord_system create_coord_system(vec3 eye, vec3 center, vec3 up) {
    vec3 n = vec3(eye - center) / length(eye - center);
    vec3 u = cross(up, n) / length(cross(up, n));
    vec3 v = cross(n, u);
 
    eye_coord_system coord_system = eye_coord_system(n, u, v);
 
    return coord_system;
}

vec3 calculate_pixel_loc(sphere sph, vec3 eye, eye_coord_system eye_coord) {
    float i = gl_FragCoord.x; float j = gl_FragCoord.y;
    float X = iResolution.x; float Y = iResolution.y;
    float aspectRatio = iResolution.x / iResolution.y;
    float d = distance(sph.pos, eye)/2.0;
    float H = 1.5; float W = H * aspectRatio;
 
    vec3 C = eye - eye_coord.n * d;
    vec3 L = C - eye_coord.u * (W/2.0) - eye_coord.v * (H/2.0);
    vec3 s = L + eye_coord.u * i * (W/X) + eye_coord.v * j * (H/Y);
 
    return s;
}

void main(void) {
    s1 = sphere(vec3(0.0), 1.0, vec3(0.3), 1);
    s2 = sphere(vec3(dance_little_sphere(), 0.9), 0.3, vec3(1.0, 0.0, 1.0), 2);
 
    eye_coord_system eye_coord = create_coord_system(eye, s1.pos, up);
    vec3 s = calculate_pixel_loc(s1, eye, eye_coord);
    vec3 ray_direction = s - eye;
 
    vec3 col = vec3(0.3);
    col = get_color_of_point(eye_coord, eye, ray_direction, s1, col);
    col = get_color_of_point(eye_coord, eye, ray_direction, s2, col);
 
    gl_FragColor = vec4(col,1.0);
}

Basically, if we've hit the big sphere, we send another ray into space and see if it hits anything else.  If it hits the second sphere, we color that pixel the color of the second sphere.

October 26, 2014

Simple Ray Traced Sphere

Here is a ray traced sphere!  It has diffuse and specular lighting.  Right now it's not doing much, just hanging out in space.


CODE:
struct sphere {
    vec3 pos;
    float radius;
    vec3 col;
    int id;
};
 
vec3 light = vec3(3.0, 5.0, 8.0);
vec3 eye = vec3(0.0, 0.0, 8.0);
vec3 up = vec3(0.0, 1.0, 0.0);
sphere s1;

struct eye_coord_system  {
  vec3 n;
  vec3 u;
  vec3 v;
};

float intersection_Sphere(vec3 ray_origin, vec3 ray_direction, sphere sph) {
    vec3 d = ray_direction;
    float a = dot(d, d);
    float b = 2.0 * dot(d, ray_origin - sph.pos);
    float c = dot(ray_origin - sph.pos, ray_origin - sph.pos) - (sph.radius * sph.radius);
    float delta = b*b - 4.0*a*c;
  float t = delta < 0.0 ? -1.0 : (-b - sqrt(delta)) / (2.0*a);
    return t;
}

vec3 get_sphere_normal(vec3 pos, sphere sph ) {
    return (pos - sph.pos)/sph.radius;
}

vec3 get_color_of_point(eye_coord_system eye_coord, vec3 ray_origin, vec3 ray_direction, sphere sph, vec3 col) {
    float intersection = intersection_Sphere(ray_origin, ray_direction, sph);
  if (intersection > 0.0) {
  vec3 pos = ray_origin + intersection*ray_direction;
  vec3 nor = get_sphere_normal(pos, sph);
        vec3 reflection = normalize(reflect(ray_direction, nor));
        float diffuse = max(0.0, dot(nor, normalize(light)));
        float specular = pow(dot(reflection, eye_coord.u), 50.0);
        specular = max(specular, 0.01); // for some reason 0.0 returns crappy results
        col = vec3(diffuse + specular);
    }
    return col;
}

eye_coord_system create_coord_system(vec3 eye, vec3 center, vec3 up) {
        vec3 n = vec3(eye - center) / length(eye - center);
        vec3 u = cross(up, n) / length(cross(up, n));
        vec3 v = cross(n, u);
        eye_coord_system coord_system = eye_coord_system(n, u, v);
        return coord_system;
}

vec3 calculate_pixel_loc(vec3 eye, eye_coord_system eye_coord) {
        float i = gl_FragCoord.x; float j = gl_FragCoord.y;
        float X = iResolution.x; float Y = iResolution.y;
        float aspectRatio = iResolution.x / iResolution.y;
        float d = distance(s1.pos, eye)/2.0;
        float H = 1.5; float W = H * aspectRatio;
        vec3 C = eye - eye_coord.n * d;
        vec3 L = C - eye_coord.u * (W/2.0) - eye_coord.v * (H/2.0);
        vec3 s = L + eye_coord.u * i * (W/X) + eye_coord.v * j * (H/Y);
        return s;
}

void main(void) {
        s1 = sphere(vec3(0.0), 1.0, vec3(0.3), 1);
        eye_coord_system eye_coord = create_coord_system(eye, s1.pos, up);
        vec3 s = calculate_pixel_loc(eye, eye_coord);
        vec3 ray_direction = s - eye;
 
        vec3 col = vec3(0.3);
        col = get_color_of_point(eye_coord, eye, ray_direction, s1, col);
        gl_FragColor = vec4(col,1.0);
}

Algo in a nutshell: Thousands of tiny microscopic minions are enlisted to go out exploring in space.  If there is an object floating around out there, some of the minions will collide with that object.  The tiny minions remember where they collide and they can figure out themselves how the object should be colored at that location, because they know the shape of the object and they know where the light is.  So they take out their tiny microscopic paintbrushes and color the surface accordingly and dutifully return back to homebase where they repeat the process over and over again.  (Their lightning fast speed makes up for their miniscule proportions).
Well.. that's how I think of it anyway


I think most of the code here complies with conventional ray traced algorithms I've seen online.  Only difference might be the method calculate_pixel_loc, which fixes any perspective distortion issues which become obvious if the sphere is moved from its origin.
Perspective distortion

Used these slides on raytracing and these slides on illumination from my old rendering professor for guidance.  (My school dropped the rendering course on ray tracing so that's why I'm not learning it in class :/)

October 25, 2014

GLSL Palm Tree - Part 2 (Adding the Trunk)

Adding the trunk and final touches!

    
Instead of taking Euclidean distances from the center of the tree, we take only horizontal distances now.
We take the x component of the pixel and threshold it with the smoothstep. Now any point which is closer than 0.01 units from the center of the tree is black.

    
Making r bigger increases the trunk size. More pixels become black because they fall within the band of 0.05 pixels that are selected with the smoothstep function.
We are using abs because we want pixels to both right and left relative to the center of the tree.

    
Make the image sharper by decreasing the range.

But what about that annoying top part?

    
Just use the magic eraser! (He said the “over” operator in the video, which I think could mean the complement.)

    
It’s just doing a selection.
We can change the selection by changing the (2nd) smoothstep. Here we are selecting every pixel above the center of the canopy and 0.4 units above it. So everything above 0.4 is erased.

    
We have changed from 0.4 to 0.2, and observe the difference.

    
You may smooth the eraser if you so wish.

Move aside, tree.

    
Perform translation by modifying q.

They grow up so fast!

    
Translation by modifying q.

But, I’ve seen real palm trees and I don’t think the trunks grow quite that straight.

    
Well alright then.
Add a sin component to bend the trunk.

    
Tweak amplitude and frequency.

  
Decrease frequency to get a nice curve.

    
Subtract the sine wave to flip it.

The trunk still doesn’t look right.

    
We can add another cos component to r to make the trunk wavy.


We can also modify amplitude to change how much influence cos has.

But I thought palm trees liked living on beaches?

    
Ground the palm tree by using an exponential.

    
Tweak the value inside the exp.

But the sky’s boring.

    
Alright then let’s make a color gradient.
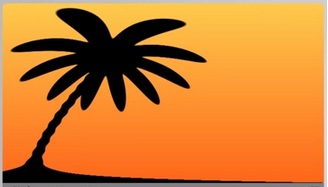
Use the mix function to supply two colors and a “weight” based on y value of pixel. (More yellow when y is closer to 1.0, more orange when closer to 0.0).

    
For a better sunset, push the orange down in the horizon using sqrt.
Coordinates go from 0 to 1. Taking the sqrt of a number from 0 to 1 makes the number bigger (like sqrt(0.5) ~ 0.77). Bigger numbers in this case means more yellow. It’s important that sqrt doesn’t change 0. That means the orange will always be there on the bottom, it won’t disappear completely.

//////////////////

And there you have it.  A tree for you and me.

October 21, 2014

GLSL Palm Tree - Part 1 (Creating the Canopy)

So IQ was nice enough to post this tutorial explaining some basic drawing with maths principles and I thought a lot of it was important enough to jot down so here's basically a step by step of how he got this palm tree using GLSL.


The first part will explain how to get the canopy of the tree.

/////////////////////////

    
Starting off simple!


Adding a gradient by incorporating x values in!

    
Add a diagonal gradient by incorporating both x and y!

    
But instead of coordinates, let’s use distances instead to make gradients.
Here we are taking measurements of every pixel from the center.

Let's add more control to our gradient!

    
Smoothstep takes two numbers (0.2, 0.3 in this case), and the distance. All distances less than 0.2 become black, and all distances greater than 0.3 become the default color.

    
We can make the black part bigger by increasing the second number.
Basically we can change the inner and outer radius by increasing the first two numbers.

    
See? Now we made it smaller.

    
Or we can increase the sharpness.
(Note that we put the distance in variable r now).

    
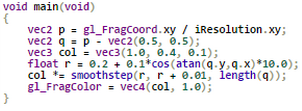
Introducing cos now! It makes things go up and down.
We took r and increased/decreased it by 0.1.

    Note that these valleys are 0.1 units from the center.

    Note that the peaks are 0.3 units from the center.

    
The value that’s multiplying cos is the amplitude. We can change the size of the peaks.

    
The value multiplying inside the cos is the frequency. We can change the number of the peaks.


    The atan (arc tangent) measures the position of every pixel around the circle.
    So things at the top start as 0, then become 1.5, 3.1, etc. It’s a measure along the circle.
    We feed it to the cos to get the spikes along the circle.


We can create a bend by adding the x value in.

    
And we can rotate it by adding a constant inside the cos.