So IQ was nice enough to post
this tutorial explaining some basic drawing with maths principles and I thought a lot of it was important enough to jot down so here's basically a step by step of how he got this palm tree using GLSL.

The first part will explain how to get the canopy of the tree.
/////////////////////////
Starting off simple!
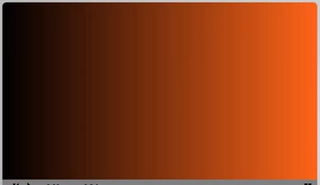
Adding a gradient by incorporating x values in!
Add a diagonal gradient by incorporating both x and y!
But instead of coordinates, let’s use distances instead to make gradients.
Here we are taking measurements of every pixel from the center.
Let's add more control to our gradient!
Smoothstep takes two numbers (0.2, 0.3 in this case), and the distance. All distances less than 0.2 become black, and all distances greater than 0.3 become the default color.
We can make the black part bigger by increasing the second number.
Basically we can change the inner and outer radius by increasing the first two numbers.
See? Now we made it smaller.
Or we can increase the sharpness.
(Note that we put the distance in variable r now).
Introducing cos now! It makes things go up and down.
We took r and increased/decreased it by 0.1.
 |
Note that these valleys are 0.1 units from the center. |
 |
Note that the peaks are 0.3 units from the center. |
The value that’s multiplying cos is the amplitude. We can change the size of the peaks.
The value multiplying inside the cos is the frequency. We can change the number of the peaks.
 |
The atan (arc tangent) measures the position of every pixel around the circle.
So things at the top start as 0, then become 1.5, 3.1, etc. It’s a measure along the circle.
We feed it to the cos to get the spikes along the circle.
|
We can create a bend by adding the x value in.
And we can rotate it by adding a constant inside the cos.